


QR Plug-in for KP2A
คำอธิบายของQR Plug-in for KP2A
This is a plug-in app for Keepass2android (https://play.google.com/store/apps/details?id=keepass2android.keepass2android) or https://play.google.com/store/apps/details?id=keepass2android.keepass2android_nonet).
It adds the following features to Keepass2Android:
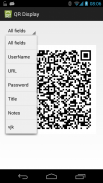
- display passwords, usernames etc. (or the full entry) as a QR code
- scan QR codes to quickly find an entry
- scan QR codes to add the scanned text to your Keepass database.
This plug-in can be used to transfer database entries from one Android device to another, e.g. if you want to securely share credentials with a friend. Therefore, install it on both devices and then:
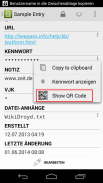
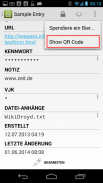
1.) open the entry you want to share
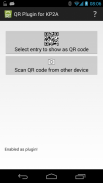
2.) select "Show QR Code" from the options menu (in the action bar)
3.) open the plug-in app on the other device
4.) select "Scan QR code from other device"
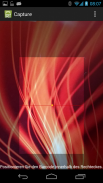
5.) scan the code from the display of the first device
6.) you are asked wether you want to search and open an entry or create a new one. Select "Create new entry"
7.) log in to your database if it is not already opened.
8.) select the group where you want to add the entry and click "Add entry"
9.) review the entry and select "Save"
</div> <div jsname="WJz9Hc" style="display:none">นี้เป็น app ปลั๊กอินสำหรับ Keepass2android (https://play.google.com/store/apps/details?id=keepass2android.keepass2android) หรือ https://play.google.com/store/apps/details?id = keepass2android.keepass2android_nonet)
มันเพิ่มคุณสมบัติต่อไปนี้เพื่อ Keepass2Android:
- การแสดงผลรหัสผ่านชื่อผู้ใช้อื่น ๆ (หรือรายการเต็ม) เป็น QR โค้ด
- สแกนรหัส QR ได้อย่างรวดเร็วพบรายการ
- สแกนรหัส QR เพื่อเพิ่มข้อความที่สแกนไปยังฐานข้อมูลของคุณ KeePass
ปลั๊กอินนี้สามารถใช้ในการถ่ายโอนรายการฐานข้อมูลจากอุปกรณ์หนึ่งไปยังอีกเช่น ถ้าคุณต้องการที่จะแบ่งปันข้อมูลอย่างปลอดภัยให้กับเพื่อน ดังนั้นติดตั้งในอุปกรณ์ทั้งสองแล้ว:
1.) เปิดรายการที่คุณต้องการแบ่งปัน
2.) เลือก "แสดง QR Code" จากเมนูตัวเลือก (ในแถบการกระทำ)
3.) เปิด app ที่ปลั๊กอินบนอุปกรณ์อื่น ๆ
4.) เลือก "รหัสสแกน QR จากอุปกรณ์อื่น ๆ "
5.) การสแกนรหัสจากการแสดงผลของเครื่องแรก
6.) คุณจะถูกถามสภาพอากาศที่คุณต้องการค้นหาและเปิดรายการหรือสร้างขึ้นมาใหม่ เลือก "สร้างรายการใหม่"
7.) เข้าสู่ระบบฐานข้อมูลของคุณหากยังไม่ได้เปิดแล้ว
8.) เลือกกลุ่มที่คุณต้องการเพิ่มรายการและคลิก "เพิ่มรายการ"
9.) ตรวจสอบรายการและเลือก "บันทึก"</div> <div class="show-more-end">
QR Plug-in for KP2A--เวอร์ชั่น1.0.1
(10-06-2014)QR Plug-in for KP2A - ข้อมูล APK
เวอร์ชั่น APK: 1.0.1แพ็คเกจ: keepass2android.plugin.qrเวอร์ชั่นล่าสุดของQR Plug-in for KP2A


 3.64
3.64
แอปในประเภทเดียวกัน

คุณอาจจะชอบ...


